Yaesu VX8-DR powered using RC LiPo Batteries

IMG_3388

I recently passed my Radio Amateur License Exam here in Canada. For my first radio I wanted something easily portable that I could take with me any where. I purchased a Yaesu VX8-DR handheld transceiver or HT for short.

The battery life of the standard pack (1100mAh 7.4V) and high capacity pack (1800mAh 7.4V) are commendable at about 4-6Hrs, well until you press the PTT and start chatting. At 5W power output, they get used up pretty quickly.

Another factor in this is that you cannot transmit while plugged in with the supplied charger. It just doesn’t put out enough current.  So the what’s the answer? I have a cupboard full of RC LiPo at 11.1V and 14.8V nominal ranging from 2200mAh, 5200mAh and more. That should do the trick nicely.

NOTE: I should mention I haven’t tried the 4S (14,8V,16.8Vmax) batteries yet. VX8-DR specs say 12Vdc is ok. Car batteries are 13.8V when charging, so not sure if the regulator can take the higher voltage of the 4S.

I simply cut the cable of the supplied charger, and solder a XT60 connector inline. Now I can connect any of my RC LiPo batteries and save the power in the built-in battery packs when i need to go truly mobile. The RC batteries can also charge the internal battery, which is great. Maybe i need to enter some QRP contests 😉

The other benefit, as I live in a earthquake zone, that in an emergency, I should be able to run the radio for at least 72Hrs with no need of a recharge… awesome.

How to Configure a Switch for CH8 on the Iris Quad

IMG_1464If you have a new Iris Quadcopter from 3DR with a FlySky RC Transmitter, you may want to add CH8 option to trigger other features. Below is a walk-through on how to add this to the standard Iris setup.

NOTE: This walk-through works by copying the settings that make CH7 work to CH8. This means you need a preconfigured FlySky from 3DR which is setup for Iris. I will do a later walk-through on how to do it generally for Er9X (OpenTx)


Continue reading

Top Tip: Fly-By-Wire B Mode Altitude Behaviour

FBW-B-GoogleEarth

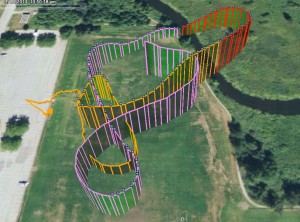
A couple months ago I was testing ArduPlane and some of the different flight modes. I was not getting on very well in FBW-B* mode. If you look at the image above you will see the purple track that represent FBW-B (Red is FBW-A and Yellow Manual).

While I was flying I was losing altitude and I couldn’t understand why. You can see just before the path goes red to FBW-A, I’d lost a lot of altitude (50m down to 25m) and was heading for some pesky trees. I switched to FBW-A and pulled up out of this ‘death dive’. 😮

The problem was that FBWB_ELEV_REV was set to default of 0. This means ‘up elevator’ (pulling back in the elev stick) means the plane will go to a lower altitude. Setting this to 1, means that pulling back on the stick will put the plane at a higher elevation. This just makes much more sense to me when you are using pull-back to go up in manual that FBW-B does the same.

see http://code.google.com/p/ardupilot-mega/wiki/FlightModesFlyByWire (And I will update the doc 😉 )

*I stopped using the airspeed sensor as I thought it was faulty, now looks it was just my interpretation of the the controls

Top Tip: How to Make Throttle Control Less Reactive

If you need to dial down the reactiveness of your quadcopter throttle when you are flying in stabilize mode you can add some Expo to it. Expo makes throttle movements less aggressive at 50% throttle, but as you move further away from centre the rate increases still leaving you with full range of power.

Here’s a short video I shot on how program the Expo feature for your throttle channel on an Open9x programmed Turnigy 9x