For technical support please try the
Q&A
Discussion Forums
Tech Support
How to Connect FIND MY DRONE / MAVPilot to Your Drone.
NOTE: The section below is being replaced by the newer ESP8266, please see forums for help. Thx
Long Range Radio Bridge – WiFi to 915MHz (or 433Mhz) 3DR Telemetry Radio
Below are instructions on how to connect FIND MY DRONE or MAVPilot using WiFi to a 3DR 915 or 433MHz Telemetry radio. NOTE: The instructions are a working DRAFT, please leave suggestions and improvements in the comments. Thx.
Contents
- Parts List
- Configuration Introduction
- Setup Using Infrastructure Mode
- Setup Of a Software Access Point
- Assembly of WiFi Bridge

- 1 x Roving Network RN-XV Wi-Fly module
- 1 x ExtremeBee Adapter or XBee Explorer Regulated
- 1 x 5 pin FTDI to FTDI cable i.e. 5 Pin 0.1″ female headers
- 1 x 5V uBEC e.g X5 uBEC
- 1x XBee USB adapter OR 1 x FTDI Cable.
Optional
- 1 2-pin header @ 90Deg e.g http://store.3drobotics.com/products/1×04-right-angle-pin-header and cut in half. If you use this to connect the uBEC (or you can solder the 5V and GND wires to the board)
Wi-Fly RB-XV Configuration
The first step is to configure your RN-XV to work on your WiFi Network or as a standalone Access Point using your XBee USB Adapter or FTDI cable This simplest configuration which is great at home when you have an available WiFi network is Infrastructure mode. It’s Good for testing, and leaves your computer able to connect to the internet.
To configure the WiFly connect it using an FTDI cable to your computer. (I’m using a Mac so this will be Unix flavour, for windows you can use a terminal program like Hyperterminal)
The default baud is 9600, to connect I run Terminal and the command
screen /dev/cu.usbserial-AM01RMWT 9600
type $$$ to enter setup mode.
Option: Infrastructure TCP
- factory R
- set wlan ssid YOUR_SSID
- set wlan phrase PASSWORD
- set wlan join 1
- set ip flags 0x6 (means TCP connection closed on disconnect)
- set ip proto 2
- set uart baudrate 57600
- save infratcp (save it with a name, so easily switch configs with load later)
- save
- reboot
Or if you want a fixed ip add the lines
- set ip dhcp off
- set up address 10.0.1.211 (or the address that is free on your network)
Now you should be able to connect using Mission Planner TCP option to DHCP assigned IP address on port 2000
NOTE: You can always connect the RN-XV Module directly to the Telemetry port on the APM2.5. This is useful when at home tweaking missions etc..
Option: Soft AP You can also set the Wi-Fly up as a micro-router, which is great when in the field. In this mode device connect to the device as before and do the following NOTE: You need to have connected your WiFly module to the internet using the above steps
- set ftp address 0
- set ftp filename wifly-EZX-AP.img
- set dns name rn.microchip.com
- ftp update
- factory R
- set uart baudrate 57600
- save
- reboot
- set wlan join 7
- set ip dhcp 4
- set ip address 10.0.0.1
- set ip net 255.255.255.0
- set ip gateway 10.0.0.1
- set ip proto 2
- set wlan channel 11
- set wlan APMNetwork
- save softap
- save
- reboot
You can simply connect your iPhone to the APMNetwork to 10.0.0.1:2000 to connect to the APM
Assembly of WiFi Bridge. 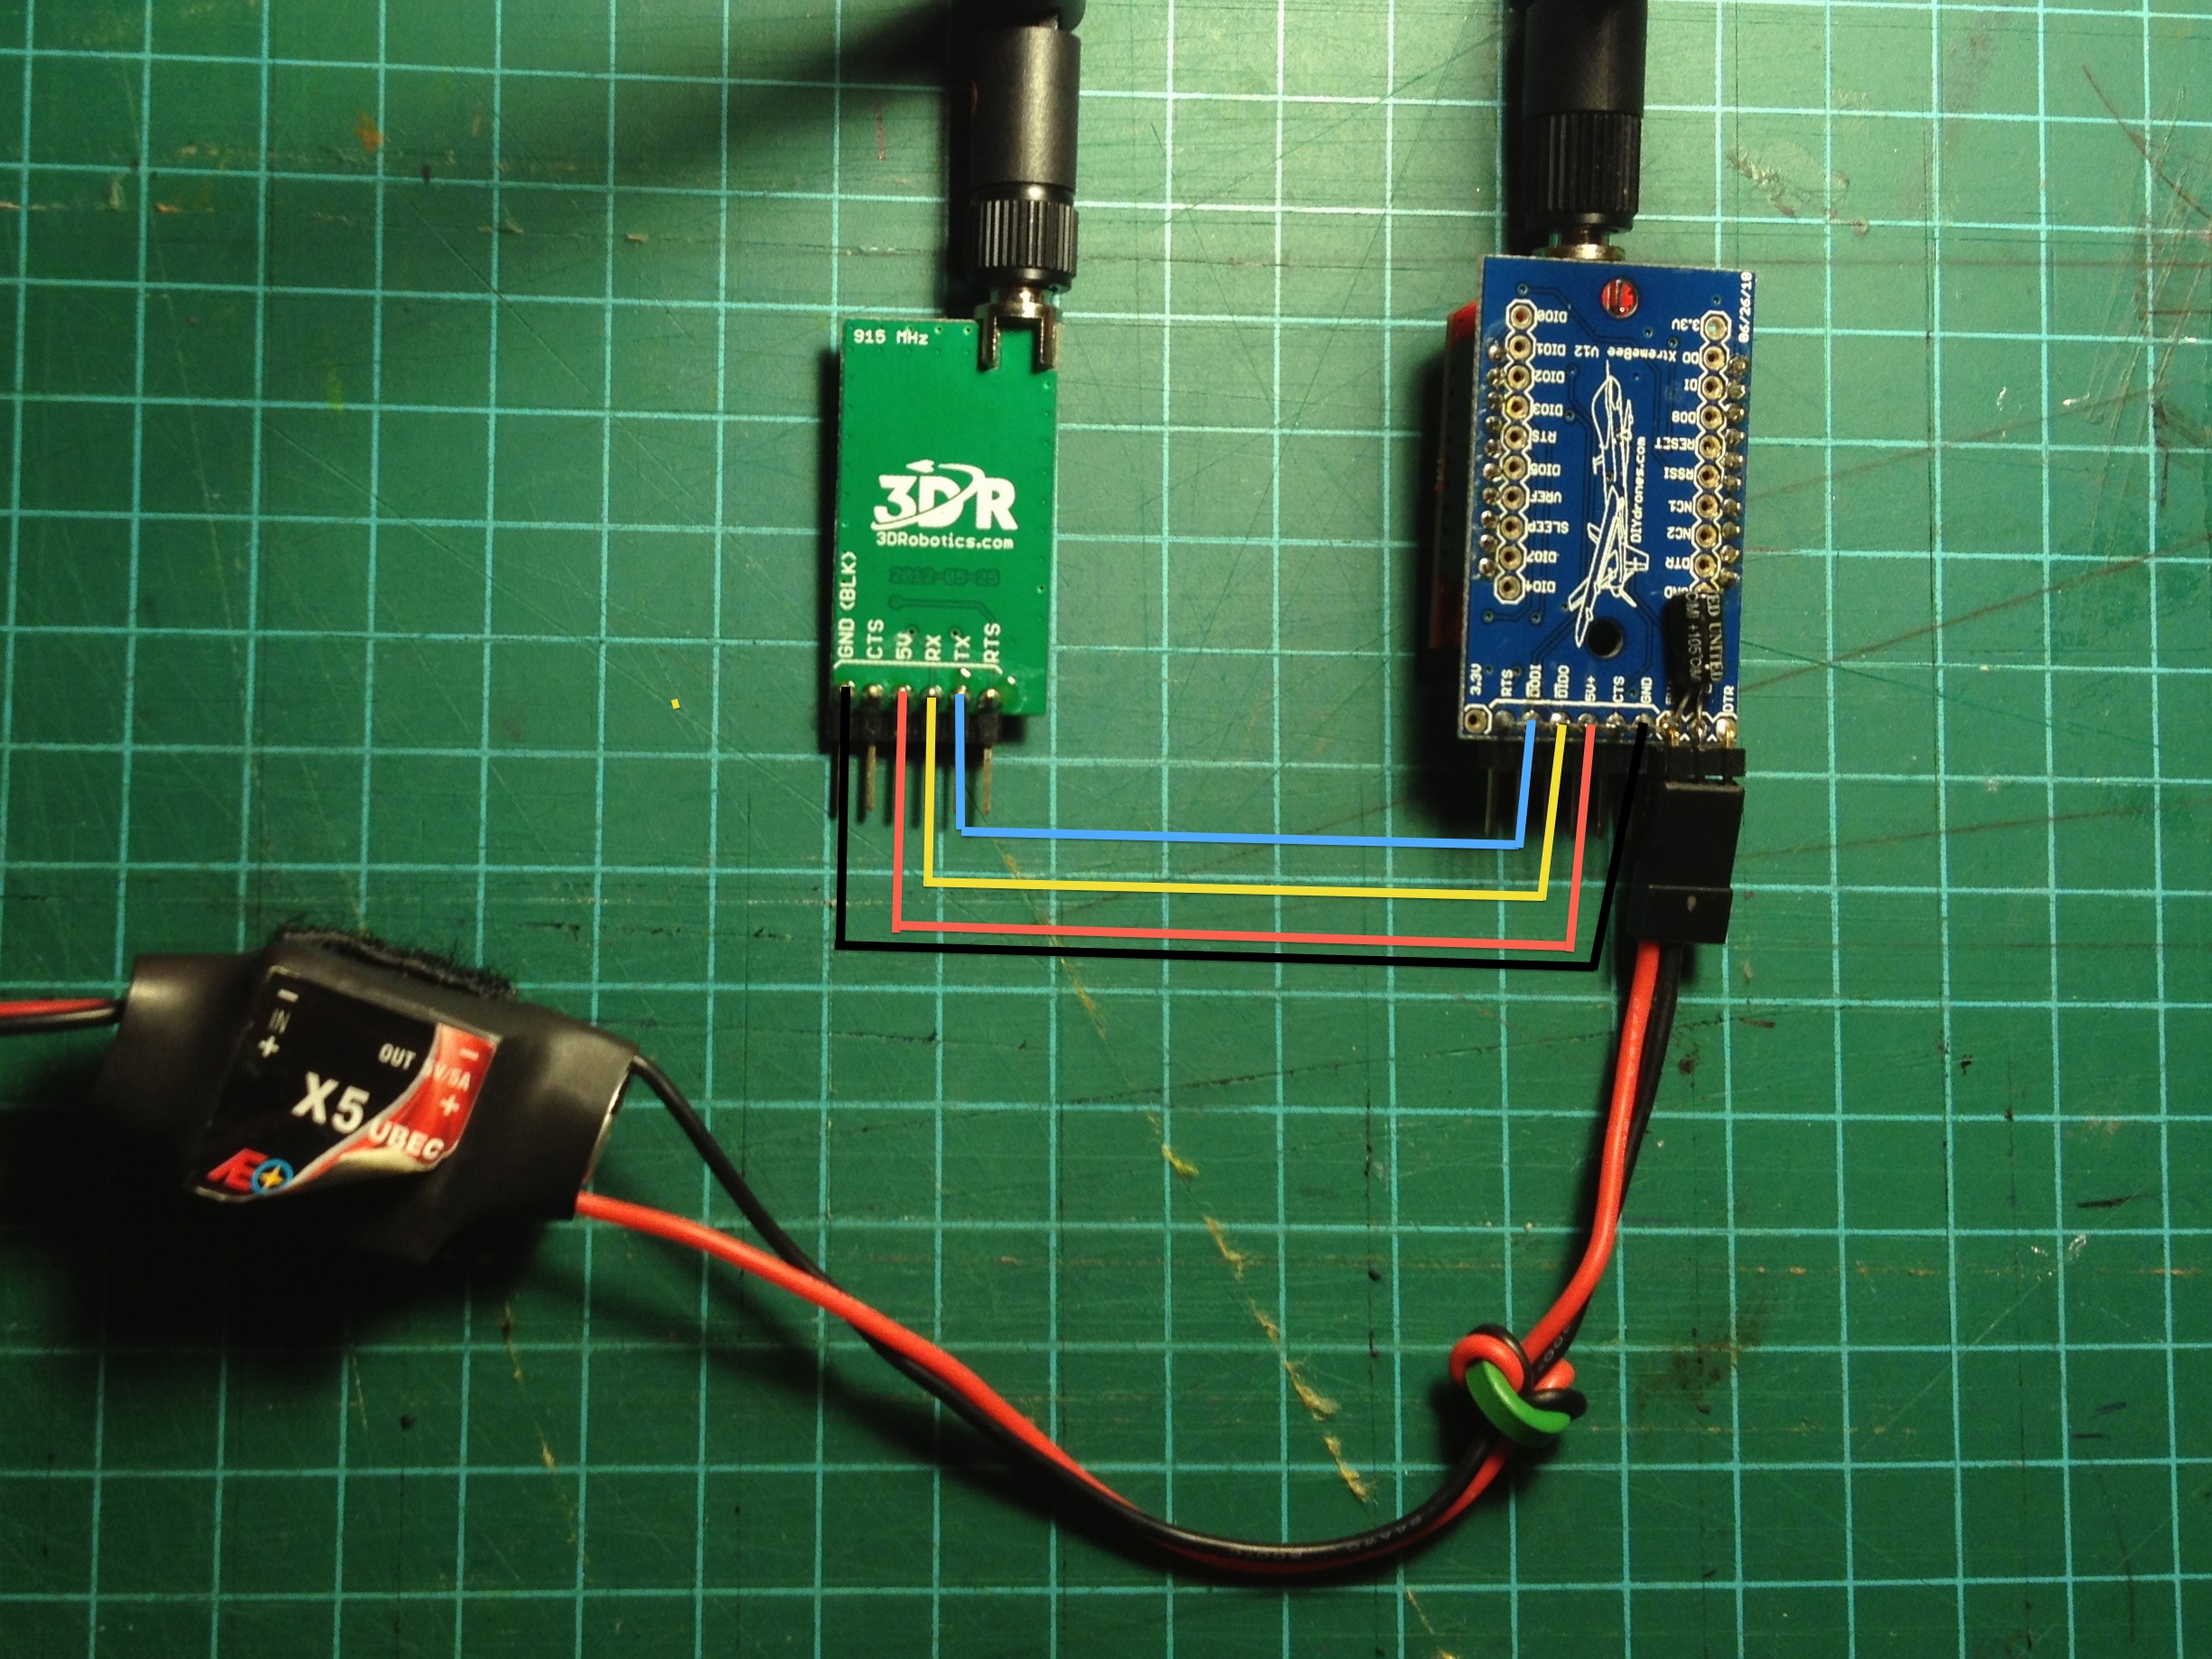 To create the WiFi to 3DR Radio bridge you need to connect the serial ports of the two radios. This means you need to connect (see following color coded table)
| RN-XV | DATA FLOW | 3DR Telemetry Radio |
| 5V (RED) | <-> | 5V |
| GND (BLACK) | <-> | GND |
| RX (BLUE) | <- | TX |
| TX (YELLOW) | -> | RX |
Also to power the system you need to connect 5V/GND from your voltage regular (uBEC) For the parts listed above:
- First you need to follow the instructions to assemble your XTreameBee Adapter
- Solder the 2 Pin Header to the XtreameBee board or uBEC directly to spare 5V/GND
- Connect the 5 FDTI cable between the XtreameBee and 3DR Radio. Black to GND connections
- The GND is in the middle of the board on the XtreameBee, not the edge like the 3DR Radio
- The picture shows a different shorter FTDI cable, but other than that its the same.
- Put the XtreameBee in slave mode (this swaps RX/TX lines)
- Solder the 2Pin connector to 5V/GND pins on the XTreamBee board
- IMPORTANT. Swap the 5V/GND pins in the uBEC connector, the middle pin is not 5V on the board.
- BEFORE YOU POWER UP, double check that 5V & GND are connected correctly, other blue smoke will appear. If you mix up RX/TX, no harm will occur BUT Power must be connected correctly.
- Power up: you should be good to go. Enter the ip address in the settings page and press the ‘refresh’ button in the app to connect.
Other Options You can use XBee Regulated Breakout board from SparkFun i.e. https://www.sparkfun.com/products/11373
(Note: don’t use the older board https://www.sparkfun.com/products/9132 as the RN-XV is not compatible)
hi I’m looking at MAVPilot now on in the app store does it have the follow me feature like mission planner does on android
regards Terry
Currently MAVPilot does not have a follow-me feature
I’m thinking of compiling a firmware for the cheap ($20) and readily-available TPlink TR-WL703n router to forward serial communication from a 915Mhz telemetry radio connected to the router’s USB-host port (there appear to be drivers in OpenWRT for ftdi usb-serial converters) to a wifi network created by the router (via the ser2net library). If I got this to work, would this replicate the functionality of the list of components above, and would you consider adding another user to the beta test so that I could try it on my iPad?
I’ve already got several of these little routers running OpenWRT, performing various functions around the house (and in the car). Highly recommended for any hacks that could benefit from a low-powered Linux device with wifi.
Yes that sounds like it would work just nicely.
Hi Bill.
what happened to MAVPilot? Cant find the app in AppStore, and the Beta test is also gone. Is there a Final version?
both RDF 900 are connected and solid green
update
I did get it all set and connected to the little RN-XV. I see and can connect both my adroid tablet and or my iPhone to the little module but cannot seem to connect the final piece of the puzzle and get data to the ‘Find my Drone’ app on my iPhone. I also have Andropilot on my tablet… not sure how to get the data to that app either. I feel like I’m getting close but need a push over the finish line!
Hi Bill
I bought the RN-XV and all the parts above but I can’t for the life of me figure out how to get it connected to my computer. It powers up but I never see it in my list of available wifi networks. I have tried it powered via the FTDI / USB cable and with a separate power source. Shouldn’t I be seeing a new network ‘wifely’ once the thing is powered up? Any help would be appreciated.
i would very much like to have this product, however i know that i can not handle the rpgraming, having soent well over 40 hours trying to access hyperterina to make a mod work on my paritorit 2.0 drone. so question will you be creating a unti that would work without the extensive programing knowledge? IF so i would likley like to purcase same.
I have a futaba 18mz transmitter that I’m using with one of my airplanes, on this airplane I also have a GPS sensor from futaba, according to the information that I read for your app “find my drone” it says that I could manually put the GPS coordinates into the app in the manual mode. But I am unable to get into the settings mode of the application so that I could put in the coordinates. Can you help me out with this? Thanks, Bill
You need to use Apple Settings App. It’s the same app where you set your WiFi conenction etc.. for your iPhone. Just scroll down to the entry for Find My drone
Hi I downloaded the app and the settings screen is not there all I have is the compass & grid map. I cant see anywhere an instruction how to use.
I like the last post said am a complete newbie to the sport and not really up on tech stuff like this. Like him I would love to just get a unit put in my plane and off I go, I know others in the club are very interested also in this as many aplane has had to be searched for losing precious flying time.
Your help would be most appreciated.
Regards
Rob
Please send an email to support at communistech.com and I will be happy to get you up and running.
HI Bill… the MavPilot and Find my drone looks like a great product, but the programing is way over my head for a newbie. Just want something that will show where my plane is on an iphone map. Will there be a ready to fly package available without programming? “plug and play”, if you will. Would like the learning curve to be no more than- install a module on my plane, and turn on my iPhone. Wondering if such simplicity is a tall order. LIVE real time tracking displayed on a map would be even better! thanks!
I’m going to create a configuration program for the RN-XV to make it simpler to set-up in future. Also the Bluetooth Low Energy solution requires no setup like WiFi.
Hi I have Iphone(s) and Ipad 3 so when and if you are ready I will be more then happy with beta testing. please let me know.
There is a link at the end of the post to signup see https://www.communistech.com/blog/mavpilot-alpha-and-beta-test/
I’m trying to understand how the Find My Drone App is suppose to work? If I have a laptop in the field hooked up with telemetry is there any benefit to using the Find My Drone App? Can I use the laptop instead of wiring the wifi add on to help the Find My Drone App?
Thanks,
Richard
In the field, the idea is that you are using your computer over the WiFi-915Mhz bridge, when the MAV goes down, you can then connect Find My Drone and then find it. Your phone being more potable than a laptop.
You could use the WiFi from your laptop, if you have your laptop setup for ad-hoc network and Find My Drone can connect to a TCP server. This would eliminate using the RN-XV module (though now you will always need to be in range of the laptop). It may require some programming depending on the software you are using on your laptop. The ideal scenario would be a Python server that allows your Ground Control Station to connect to a port that forwards packets the serial port. This same Python server would allow for a TCP connection from a remote host on the network. Then you could use both. MAVProxy can be configured this way I believe, but I have not tried yet.
The final idea is to provide a Bluetooth Low Energy to 915MHz bridge that you can carry, this means you can then Find Your Drone from further a field and is less tricky to setup. I have a prototype and a solution will be coming soon. This should be available in a DIY form when i release MAVPilot a GCS for iPhone.
Thanks for your interest.